macOS Mojave worked great(ish) in Virtualbox. Does it work in VMware? Turns out, yes – works great, and has guest additions.
Virtualbox is fantastic for Open Source software, but VMware is one of the primary players in the virtualisation scene. As soon as I got macOS working in Virtualbox, I almost immediately turned my attention to doing the same thing in VMware… Because I’m mad.
Not only does it work just as well as it does in Virtualbox, you can also install guest additions thanks to some super smart cookies in the scene. While this doesn’t exactly perform miracles, you get a much more smoother experience once it’s installed.
❓ The Stuff
If you Google this approach, you’ll find that there are pre-made ISO and vmdk floating around. In this project we won’t use anything custom, start from scratch with regular resources. As a result, you will need a donor Mac to get the installer image from. In this project, I’m using the following:
I have…
- VMware Workstation 16.1 (Player should work too).
- AMD FX-4350.
- Should be easier if you’re running Intel.
- 8 GB of RAM.
- A donor Mac to grab install medium.
- If you got a VBox machine from before, that counts.
I got…
- Mojave install medium.
- macOS Unlocker V3.0 for VMware Workstation.
- A cup of tea.
- A spare hour.
Everything should work on the main 3 platforms (Windows, macOS and Linux) that VMware support. Although if you’re on macOS already, you shouldn’t need to do any extra steps to get things working.
💿 Getting the Mojave Install Medium
The way of extracting the install medium for Mojave has not changed, so if you want to grab the macOS ISO, follow the guided segment on the Virtualbox guide (Creating the ISO). Once you’ve got your Mojave.iso file, come back to this guide and we can proceed with infecting your VMWare with Apple.
🔑 Unlocking macOS in VMware Windows & Linux
Apple isn’t particularly happy about people trying to emulate macOS and OS X on non-Apple platforms against their EULA. As a result, this feature isn’t available on Windows or Linux. Boo!
Don’t stop there though, as it’s still available – just hidden. Thanks to TheJaxon and paolo-projects, the open source community have a tool to unlock these features – aptly called macOS Unlocker.
Grab a copy of the unlocker.zip from the latest releases, and unzip it. Open a command prompt or console to the directory you extracted it to, and run:
Windows: win-install.cmd
Linux: sudo lnx-install.sh (you might need to chmod +x first).
This script will change the VMware configuration to un-hide the missing macOS options, then download the system files for macOS guests. Once done, restart your VMware Player/Workstation and the options should now appear in the VM creation wizard.
🖥️ Setting up VMware
Start up VMWare Workstation or Player, and click on File > New Virtual Machine.
When the wizard starts, select (or keep on) Typical for Virtual Machine Configuration. If you’ve got some specific setup oddities you can go down the other route, but we’ll need to make some post-wizard adjustments anyway.
Select I will install the operating system later, and click next.
For Guest Operating System, select Apple OS X and then select macOS 10.14 (if you’re following with Mojave, change if you’re using another version).
Change the name or location if you desire, then click next.
Disk size is entirely up to you, depending on your use conditions. If you’re just exploring, keep it at the default 40 GB and continue. Don’t go any lower, or there be dragons.
Once you’re at the end summary, click Customize Hardware (this is the same as Edit Virtual Machine Settings on the home page if you don’t click it).
Now we’ve got the VM made, we need to make some additional tweaks to get macOS to play nicely with our platform. This is where things will get technical, so be aware that some trial and error may ensue.
In the Hardware tab, go down to Memory and set the RAM to 4GB or higher. If not, you’re in for a very choppy and slow ride.
Next, go to Processors and set both Number of Processors and the Cores per Processor to 2. Click Save.
Now we need to edit the configuration file to change a few settings that do not have options in that panel. Right click on the VM in the manager and click Open VM Directory.
Open the file <VM Name>.vmx in a code editor (if you’re using Notepad, now’s the time to grab Visual Studio Code, or even Notepad++). Add the following lines to the end of the document:
smc.version = "0"
If you’ve got an AMD CPU, you might also try adding these too, to help the VM recognise a AMD CPU it can work with.
smc.version = "0"
cpuid.0.eax = "0000:0000:0000:0000:0000:0000:0000:1011"
cpuid.0.ebx = "0111:0101:0110:1110:0110:0101:0100:0111"
cpuid.0.ecx = "0110:1100:0110:0101:0111:0100:0110:1110"
cpuid.0.edx = "0100:1001:0110:0101:0110:1110:0110:1001"
cpuid.1.eax = "0000:0000:0000:0001:0000:0110:0111:0001"
cpuid.1.ebx = "0000:0010:0000:0001:0000:1000:0000:0000"
cpuid.1.ecx = "1000:0010:1001:1000:0010:0010:0000:0011"
cpuid.1.edx = "0000:0111:1000:1011:1111:1011:1111:1111"
smbios.reflectHost = "TRUE"
hw.model = "MacBookPro14,3"
board-id = "Mac-551B86E5744E2388"
Above info found from this YouTube video.
You can experiment with changing the last 3 options for your setup, so long as they match actual Macintosh configurations.
You can now save and close the editor. Now mount the ISO you made earlier into your VM (VM Settings > CD/DVD > Connected at Power On and Choose ISO image), and click start!
🍎 Booting into the Installer
You will now boot up to see the vmware logo, then an Apple logo that pops up with a slider. If you get stuck for 5 minutes on the Apple logo, or you get the message The CPU has been disabled by the guest operating system, try the additional lines of code in the segment above (and use find (ctrl-f) to check there’s no duplicates).
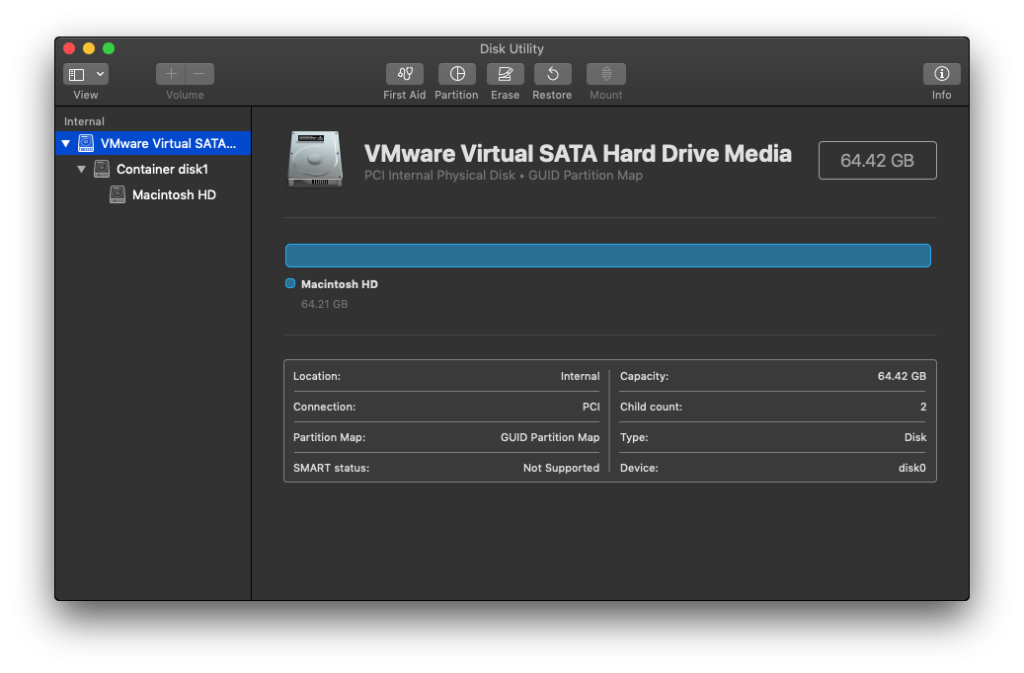
If all goes well, you’ll be greeted (after a long wait) with a the macOS reinstallation screen. Hooray! First things first, pop open Utilities > Disk Utility and full-erase and format the VMware empty disk with Apple Filesystem (APFS) or Mac OS Extended.
Once done, you can now click on the (re)install macOS Mojave option. It will then ask for your drive that you formatted earlier, and then run the installer. You’ll probably need another drink at this point.
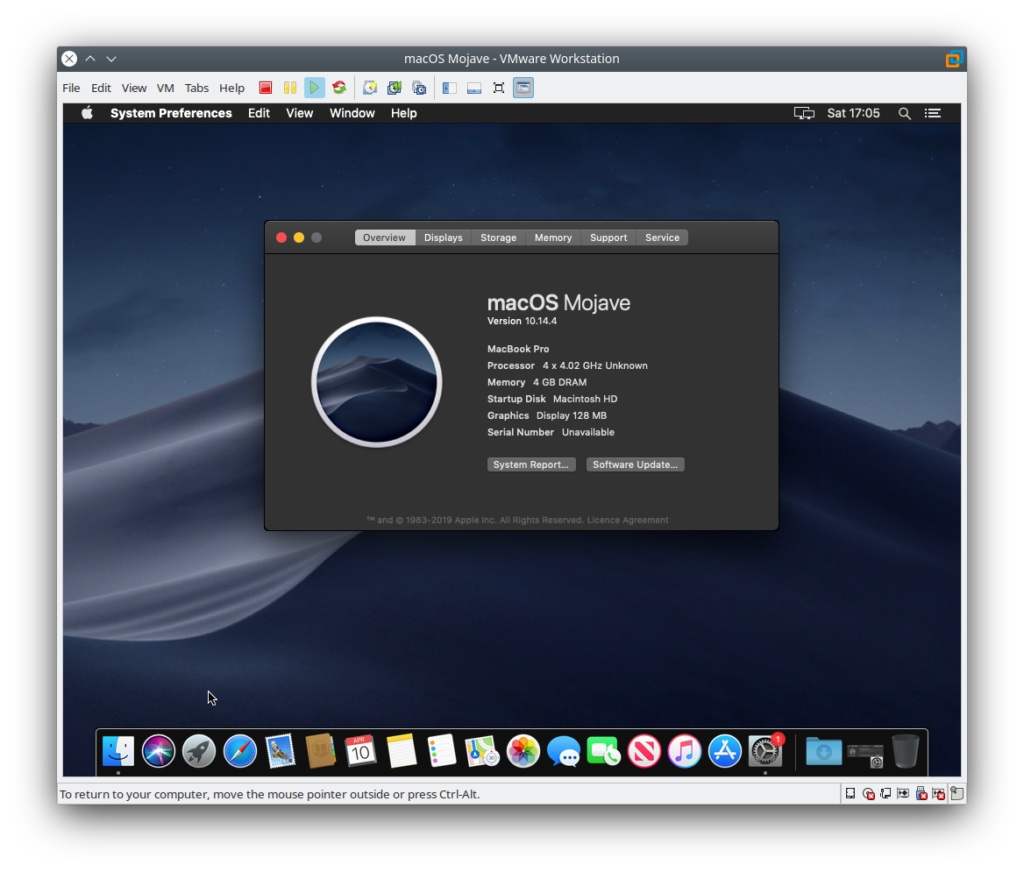
After a million hours, a few questions for initialisation, potentially a fruitless attempt to use a non-existent fingerprint sensor, you should finally boot into macOS. Congratulations! Now’s a good time to power off and take a snapshot if you’re using the Workstation edition.
❓ What works?
✅ Does
- Screen.
- Input & USB devices.
- Networking.
- Mac App Store.
- Guest additions.
- File shares.
- Screen resizing.
- Seamless mouse.
- Clipboard (text only).
❌ Does not
- Full (3D) graphics.
- Audio.
The performance is not great, and is not much different from the Virtualbox counterpart. The stand-out feature that VMware offers is the fully functioning guest additions that add a more fluid support to the system, which also improves performance to a small degree.
For powerful enough machines, this can be a great way to bridge the gap of requirements sometimes needed by Apple devices, such as the need for xcode, managing iPod devices with native iTunes, and even plundering hard drives that have been formatted with Apple-only partition formats.
🐞 Troubleshooting
Kernel Panic after updating VMware Player/Workstation.
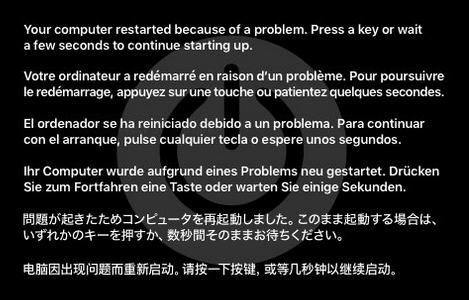
The message “Your computer restarted because of a problem. Press a key or wait a few seconds to continue starting up” is shown with a background image of a power button.Womp, womp.
If this happens to you, don’t panic! Leave that up to the processor 😏 This is caused by the update replacing files patched by the Unlocker tool. Simply re-running the Unlocker installation will fix it.
If you wish to double-check the problem is caused by the update before trying a resolution, try to create a new OS X/macOS virtual machine. if you find the OS X option is mysteriously absent, then run Unlocker again.